

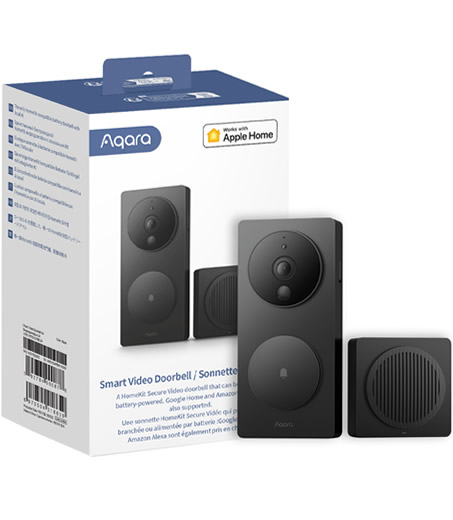
The Aqara Doorbell G4
Local Face Recognition + HomeKit Secure Video + Wired or battery-powered
Today, I’m excited to take a deep dive into the Aqara Doorbell G4, examining all of the features and capabilities that make this smart home device a top contender in the video doorbell market. At Smart Home Matters, we take our smart home technology seriously, and we’re excited to explore all of the capabilities that the Doorbell G4 has to offer.
With its sleek design and flexible installation options, the Doorbell G4 is an attractive addition to any home. But it’s the device’s advanced facial recognition technology that really sets it apart. By analysing the faces of visitors, the Doorbell G4 can trigger customised responses based on who is at the door. Whether you’re looking to unlock the door for recognised family members or receive alerts for unknown visitors, this device has you covered. But the Doorbell G4 offers more than just facial recognition. With compatibility for a range of smart home platforms and both cloud and local storage options available, it’s a powerful tool for anyone looking to upgrade their home security.
This is going to be a long read due to all the feature packed capabilities built into this small device. So let’s dive into the details and see what this video doorbell is really capable of.
Unboxing:
I’m excited to get my hands on the Aqara Doorbell G4 and see what’s inside the box. As with previous Aqara products, the G4 arrives in a stylish and eco-friendly retail and doesn’t come with an excess of unnecessary packaging.
Included in the box, we have:
- Doorbell G4
- Internal Chime with integrated WiFi and SD card holder
- Angle bracket
- Philips Screwdriver
- Manual
- USB-A to USB-C cable for the Chime
- Fixings and Fixtures
- 6 x AA batteries
First Impressions
I’m impressed with the device’s sleek and minimalist design. The large circular call button features a multi-colour illuminated LED ring, providing clear indications of the device’s status at a glance. The doorbell itself feels well-made and unobtrusive, with a hidden security screw on the side that releases the back panel for easy installation.
The back features space for 6 AA batteries, connection points for wired purposes, as well as a security switch that engages if the cover is removed, providing an added layer of protection against theft. The back panel has holes for screw fixings and a knockout panel if you wanted to use the doorbell wired through the wall or surface. On the back there is also a self-adhesive pad for easy mounting.
The chime unit is discreet, with the speaker grill on the front, a pairing button on top, and a Micro SD card slot at the bottom, along with a USB-C port for power and Aqara/Apple HomeKit pairing QR code.
The chime unit is discreet, with the speaker grill on the front, a pairing button on top, and a Micro SD card slot at the bottom, along with a USB-C port for power and Aqara/Apple HomeKit pairing QR code. On the back is a self-adhesive pad for easy mounting.
Overall, my first impressions of the Aqara Doorbell G4 are positive, with a sleek and well-designed doorbell and chime unit that provides easy installation and a range of convenient features. I look forward to putting it through its paces and seeing how it performs in our testing.

Setup and installation:
Setting up
Following the quick start manual, I first placed the indoor chime module on our hallway table on the opposite side of the wall where the doorbell would be mounted. I powered this from a USB port built into one of my wall sockets below the table (it can also be powered by any standard USB port, such as a mobile phone charger at 5V/1A (1000mA)). I then inserted the batteries in the doorbell, replaced the back cover, and left it sitting next to the chime on the table.
Note: The doorbell camera can also be hardwired to a transformer to take advantage of the SD card 24/7 recording mode and the batteries will only be used in case of power outage.
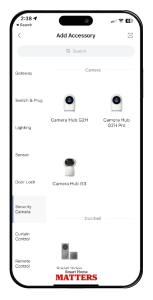
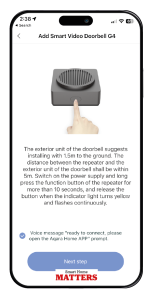
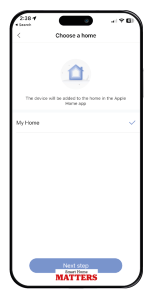
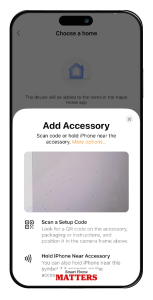
The next step instructed me to download and open the Aqara app. As a previous Aqara user, I already had the app set up, so that was simple. I then went into the app to add an accessory, navigated to the Security Camera category, and scrolled down to select Smart Video Doorbell G4.
I followed the on-screen instructions (pressed the button on the chime unit to pair, etc.), scanned the QR code, and the doorbell was added successfully. It also paired with my Apple Home during the process.

The initial attempt to load the doorbell image was unsuccessful. I attribute this to my not allowing enough time for the app to connect online. I resolved the issue by forcibly closing the Aqara app and reloading it. Upon clicking the doorbell in the app the live stream from the doorbell was immediately available.
Firmware, firmware, firmware…
Like with all new devices, I always make sure I’m on the latest version to get the most features of the device. Aqara is one to push a lot of firmware updates out since they are always updating features and fixing bugs.
After testing the video worked, the first thing I did was to go onto the three dots on the top right of the Doorbell G4 screen, scroll down, and click on “Version,” then click “Check for update.” This showed me that a new firmware version was available for installation, so I proceeded with the update. After the update finished, I went back onto the version page and refreshed in case there were any more updates. Yes, there was another new version available. Once that update was done, I checked for updates again, and it told me my firmware was up to date.
During the setup process, my Alexa app popped up to say, “An Aqara doorbell G4 has been added to Alexa.” So while I was setting up, I popped into the Alexa app and enabled doorbell notifications on my Echo devices.
At this point, the chime is connected and powered, the doorbell is online, and the firmware is up to date. Now it was time to install the doorbell, but just before I did that, I thought I’d insert my new 64GB SD card into the chime unit (up to 512GB is supported, but I don’t get that many visitors!). This actually proved a little more difficult than I thought as I couldn’t quite push the card into the chime unit far enough for it to “click” into place with my fingers. So after a few attempts, I got a small flat-headed screwdriver and gently pushed the micro SD card in until it clicked.
Installation
Installing the doorbell unit itself was easy. First, I asked my partner to view the doorbell on the app while I was positioning it to ensure the correct location. Once I had my location marked, I removed the rear cover and mounted it to our UPVC door frame using the provided screws and a screwdriver. Then, I attached the doorbell to the back plate and replaced the security screw on the side. I then mounted the internal chime on the wall in the hallway. Please be aware that there is a maximum distance of 5 meters (closer the better) between the doorbell and chime.
Included is a 20° fixed angle wedge bracket. The optional steering bracket is suitable for use when the installation position is on both sides of the door. It can adjust the direction of the doorbell lens through this 20° wedge bracket to monitor specific.
First Use
Obviously, the first thing anyone would do after installing is to ring the doorbell! This illuminated the doorbell LED around the button with one bright green flash, followed by a constant red colour. The green colour let me know that the doorbell ring was successful, and the red colour meant that the video was being recorded.
From inside the house, the chime instantly (less than 1 second) did a clear and relatively loud ‘ding dong’ sound twice. This was loud enough for me to hear from most of the house, so I haven’t gone into the app to change the volume of the chime.
I then received a notification from my Aqara app telling me that the doorbell was ringing, followed by an Apple Home notification and my Echo speakers announcing that someone was at the door.
Clicking on the Aqara notification brought me to the live view of the doorbell, and I was then able to press the handset icon, which allowed two-way speech. The audio was clear and plenty loud enough, so again, I didn’t mess with volume settings for this.
I was also asked if I wanted to disguise my voice with the voice changer, which is a fun feature for scaring the delivery driver or avoiding someone by pretending to be another family member. But I guess this is also really useful for perhaps a vulnerable person at home, as the visitor won’t be able to tell the sex nor age from the voice.
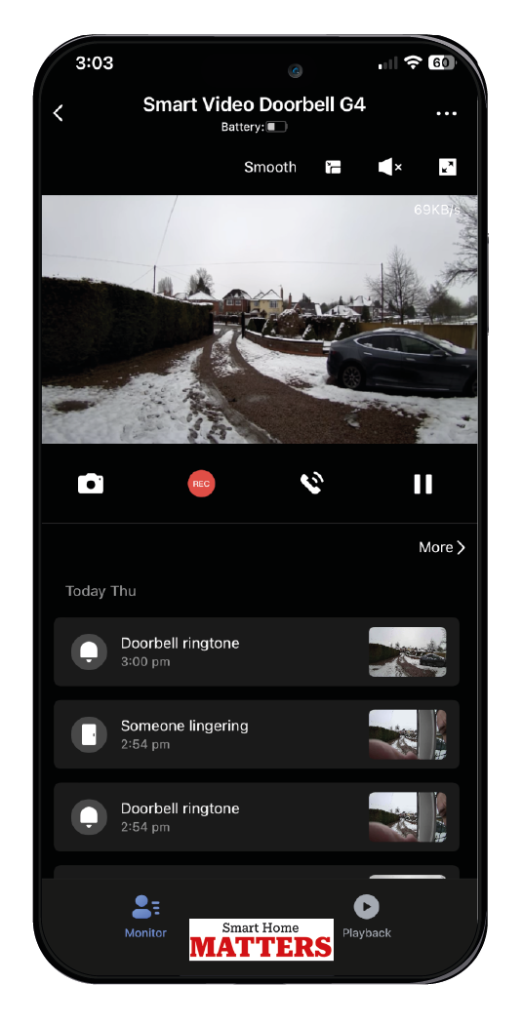
Image Quality
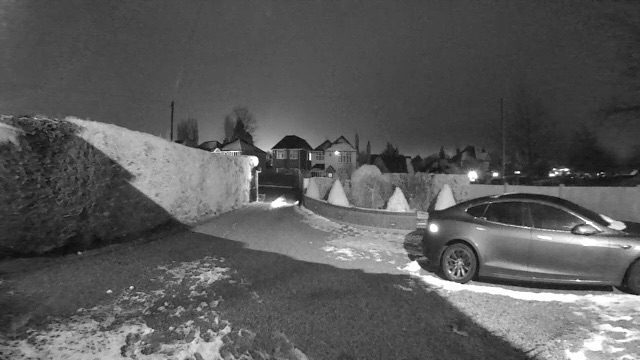
I have to say, I’m really impressed with the image quality of the G4 doorbell. It boasts a wide angle lens that covers 90% of my drive, and the image is crisp and clear at 1080p. But what really blew me away was the night vision. I’ve tested other doorbells that can’t light up anything beyond 3-5 meters, leaving the entry point of my drive in complete darkness. But that’s not the case with the G4 . Even in pitch darkness with no outside lights, I can see all the way to the end of my drive and even the houses across the street. This is a game-changer for anyone living on a dark road without streetlights.

Now for the Fancy Features
Now that it’s installed, I have a fully functional video doorbell, complete with Apple HomeKit, Alexa, and Aqara app connections. This means I can view and talk to visitors at the door from wherever I am using either the Aqara app or Apple Home. I can also get notified of doorbell presses from my Amazon Echo devices around the home. This is all very good, but it’s not as exciting as what many other brands on the market can do. Let’s get to the interesting features that are built into this that make it a step ahead of other brands.
Recording Features and Alert
Doorbell Press
As standard, the doorbell will record all doorbell presses and provide 6 seconds of recording free of charge in the cloud and/or SD card for 7 days (the SD card will keep recording until it gets full, and there is an overwrite setting available). This is enough recording length to look back on any missed doorbell presses to find out who it was. What’s also interesting is that if you do not want your videos stored in the cloud, this can be disabled, and you can record to SD storage only. Additionally, you can use Apple HomeKit Secure video, which means all of your videos can be stored with your Apple iCloud subscription for as long as your storage plan allows you to.
Motion Alerts / Loitering alert
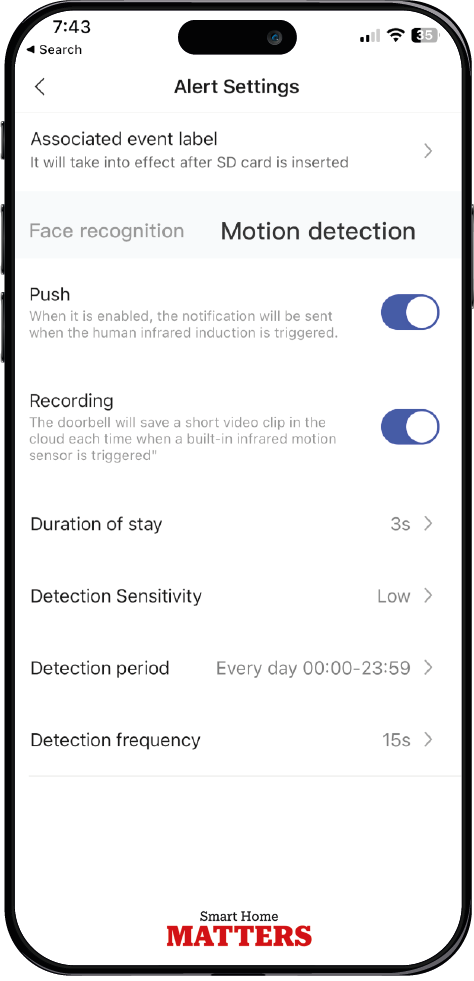
The motion alerts are a great feature that uses the built-in PIR (passive infrared) sensor, and highly customizable settings, meaning fewer false alerts as you can configure the settings to suit your property. For example, the duration of stay (also known as loitering alert) is adjustable. If you only want the alert to come through if someone is lingering around your door or on your drive, you can set this number to suit, depending on how long they have to be there before an alert is triggered.
As I mentioned before, I don’t get many visitors, so I’ve set my alert detection at 3 seconds of duration of stay, and because there is no need for anyone to come onto my driveway, I’d rather know about it if someone does. You can also configure the alerts to be active only during a set time/day schedule, such as if you only want these notifications on weeknights, for example. As with the doorbell press recordings, you will get a 6-second recording stored in the cloud free of charge for 7 days, or if using an SD card, until it gets full. These motion notifications are turned off as standard, but you can enable them in the More Settings section of the doorbell screen on the Aqara app.
The image shows how I’ve set my motion settings. I have found this to work for me, as I get notified if anyone is on my drive, and I’m yet to have a false alert, which I’ve experienced previously with other doorbells I’ve tested.
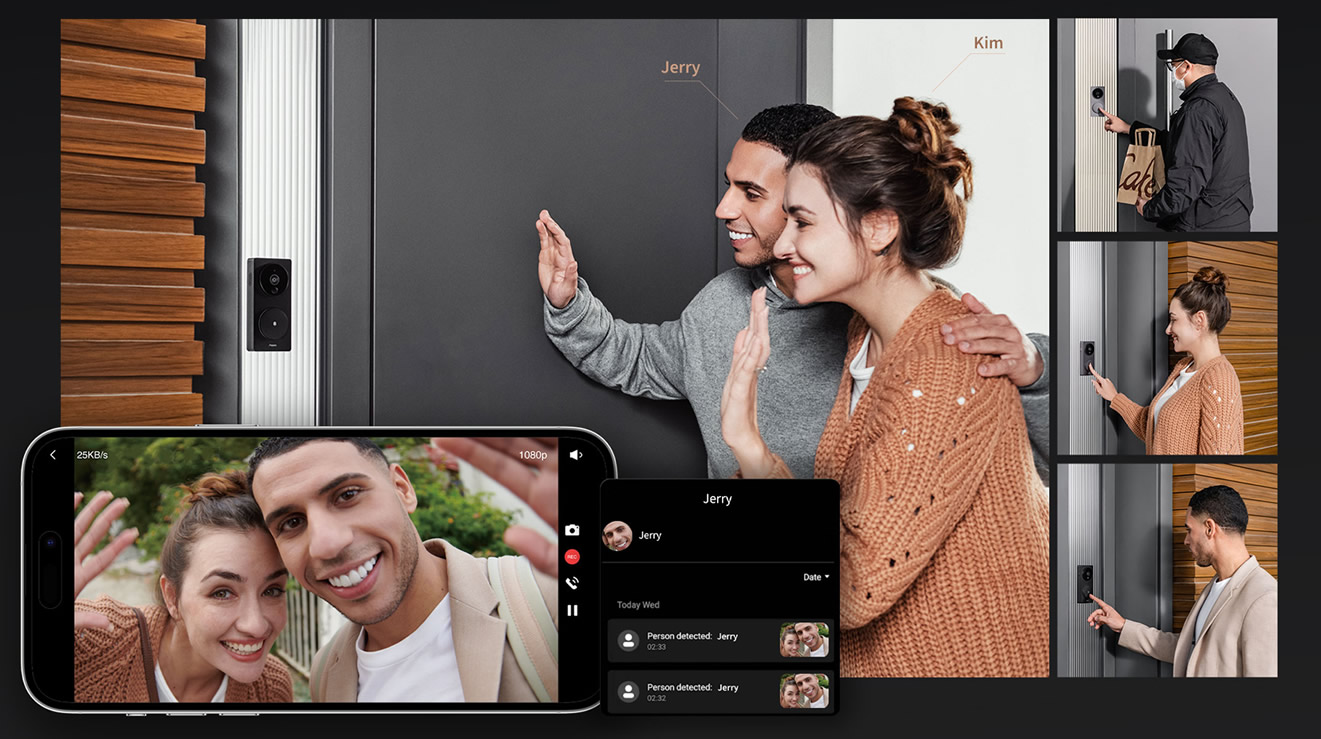
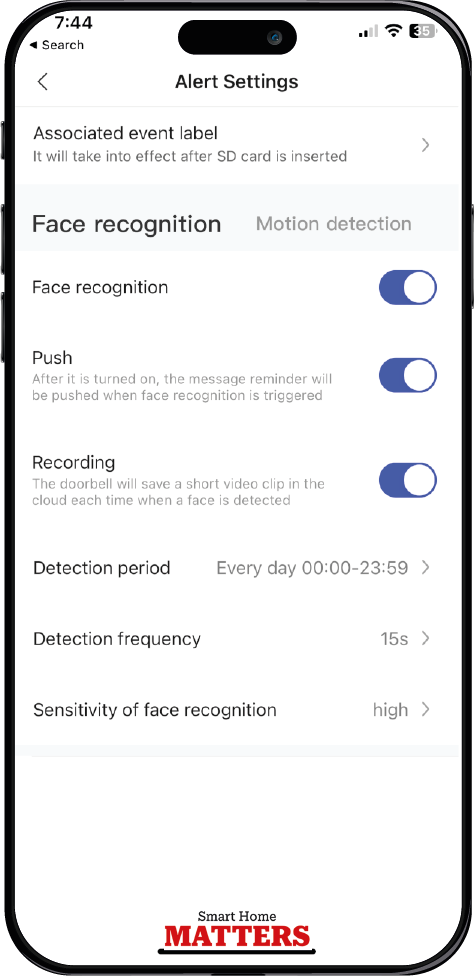
AI Facial Recognition
This is by far my favorite feature of the Aqara Doorbell G4. Once enabled, you can upload photos of yourself, your family, your postman, and your friends to the app. When they approach the door, you will be notified by a push notification with a snapshot on the notification, along with a message to say who is at your door. If it detects more than one face, it will also tell you who else is at the door with them (if their faces are programmed too, of course).
Perhaps more importantly, it tells you when an ‘unknown’ face is detected. This can be one unknown person on their own, or it could be an unknown face with a recognized face, such as your teenage daughter bringing home a new boyfriend. You would receive a notification such as ‘Sally + Unknown face detected at the front door,’ with a snapshot notification and a 6-second recording of your possibly new son-in-law! All of this is done by advanced AI technology processed locally on the device.
At first, the face detection didn’t work well with standard settings after enabling the face detection feature, but changing the sensitivity to ‘high’ seems to work well for me.
Face recognition can also trigger automations, but more on that later.
Other Alerts
There are also options to enable the following notification alerts:
Brief Overview of other features::
- Custom Ringtones
You can choose from 3 pre-set doorbell sounds for the chime and you can also upload your own MP3 files for a customised sound. Additionally, you can set up automations to play certain ringtones. - Safety and Privacy
One of the great features of the Aqara Doorbell G4 is its security and privacy features. First of all, even though you get 7 days of free cloud recording (with no pushy sales pitches to purchase any plans as they don’t offer hosted plans), you don’t need to use the cloud at all if you don’t want to. You can simply insert an SD card and turn off push recording. You can also add a security password to protect viewing of the Doorbell G4. There is also a privacy mask feature, so if you have a neighbor nearby who doesn’t want you recording their property or driveway, you can mask it out on the camera so it’s not visible or recorded. After all, we all like to keep our neighbors happy! - Forced dismantlement alarm
If someone tries to remove the doorbell from its back cover, it will trigger this notification and also play an alarm sound. Furthermore, if someone tries to steal the doorbell, you won’t lose your video recordings. All the videos are securely stored on the indoor chime, ensuring your footage is safe and easily accessible.
- Apple HomeKit Integration
For those of you who are avid Apple Home users, the integration with the G4 is packed with features. Not only do you get motion and face detection, but you also get advanced features such as parcel detection. You can use your own phone’s photo library to select faces to be used in facial recognition. Recording to Apple’s HomeKit Secure Video is easy, and you can choose when to record based on motion or only when all Apple users in your family are not at home. If you have an iCloud storage account, you can keep recordings for as long as your storage plan allows before getting full. - High or low temperature
This setting will let you know if the doorbell is suffering from extreme temperatures which may effect its performance (these will only be triggered if over 50 degrees Celsius or -18 degrees Celsius, which are neither probable in the UK)
Some Useful Tips on Recordings, Alerts, and Battery Life
Under the main doorbell screen, you will see a list of alert-notified recordings, but these will only go back 7 days. If you have a microSD card inserted and want to go back further, you need to click the playback icon in the bottom right and use the timeline to go back to dates further than 7 days. Additionally, when using battery power only, recordings are triggered only by motion, face, or doorbell press alerts. But when connected to a constant power supply (and a microSD card is inserted), the option for continuous recording is available.
You can set different colors for notifications in the timeline by going onto the ‘associated label’ section of the motion and face detection settings.
If you find you are receiving many notifications, you may want to set the sensitivity to low or increase the duration of stay figure and the detection interval period. These will also help to preserve battery life if you find the battery is decreasing too quickly.
If you want an even longer battery life, you can enable power-saving mode, but you will not receive notifications or recordings from motion or face detection. Instead, the doorbell will only wake and record when someone presses the doorbell. If that’s all you want the doorbell to do, it’s worth enabling this feature to prolong battery life.
Automations – A Doorbell Which Is So Much More.
This is where things get really interesting with the Aqara Doorbell G4. It’s not just a device for seeing who’s at your door or detecting motion on your driveway anymore. Once you start adding other devices to your Aqara app (using one of their camera or non-camera hubs), you can create all sorts of automations to trigger a variety of events. The possibilities are endless, and I’m excited to share a few of my favorite examples with you.
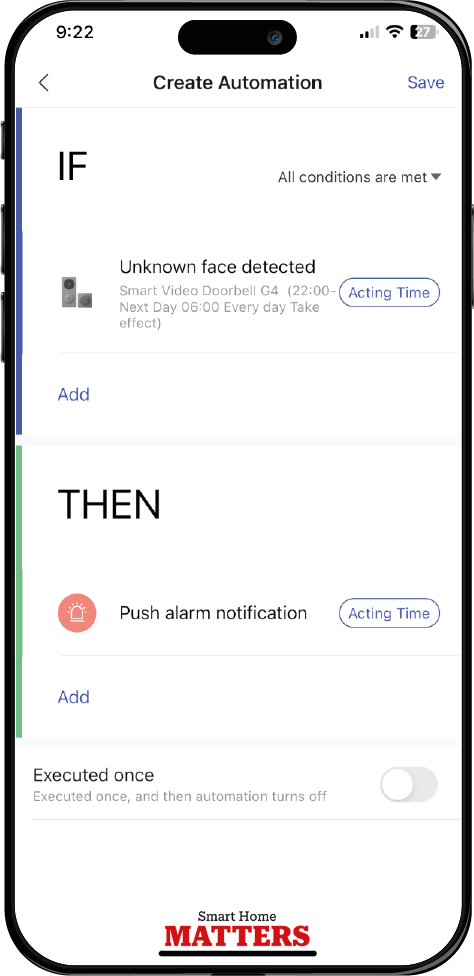
Home Alarm System
One of the most powerful features of the Aqara Doorbell G4 is its facial recognition capability, which can also alert and record unknown faces. By setting up an automation, you can turn your doorbell into a fully functional alarm system.
Here’s how I did it: Between the hours of 10 PM and 6 AM, if an unknown face is detected on my driveway by my Aqara Doorbell G4, instead of a regular iPhone or Android notification, it will trigger a critical alert. This means that even if my phone is on silent or “Do Not Disturb” mode, the alert from my doorbell during this time will override my phone’s settings and send a loud alarm as a critical alert.
It’s a clever and effective way to beef up my home security system, and it gives me peace of mind knowing that I’ll be alerted immediately if there’s any suspicious activity outside my home.
Automate Devices with Facial Recognition
The facial recognition technology can be used to great effect by triggering devices based on who comes home. This clever feature allows users to customise their doorbell and run events based on the family member who arrives home. However, it’s important to note that in order to ensure this feature to function correctly, face detection schedules should be set to when users are likely to return home, rather than when they are leaving. This will prevent the automation from being triggered by accidental glances at the doorbell when locking up for work.
One of the great benefits of this automation is the ability to play a custom ringtone on the indoor chime, which lets others in the home know who has arrived. Additionally, the automation, for example, can be set to automatically start a user’s playlist on their Sonos speaker and set the Aqara radiator thermostat TRV to desired temperature based on the weather outside. By utilising facial recognition technology in this way, users can create a personalised and convenient home automation experience.
Conclusion
After thoroughly testing the Aqara Doorbell G4, I can confidently say that it is a top contender in the video doorbell market. Its advanced facial recognition technology, combined with its sleek design and flexible installation options, make it an attractive addition to any smart home. One of the standout features of the Doorbell G4 is its ability to recognise faces and trigger customised responses based on who is at the door. This makes it easy to keep track of visitors and ensure that only authorised individuals are granted access to your home.
But the Doorbell G4 offers much more than just facial recognition, with compatibility for a range of smart home platforms and both cloud and local storage options available. I was also impressed with the device’s high-quality video and audio capabilities, allowing me to clearly see and hear visitors at my doorstep.
Overall, the Aqara Doorbell G4 is a powerful tool for anyone looking to upgrade their home security and make their smart home even smarter. With its advanced features and easy setup, I highly recommend this device for anyone looking for a reliable and secure video doorbell.
Where to Buy
Visit Aqara UK Offical Site here: Aqara Doorbell G4
Learn More:
View The Smart & Secure Centre’s Video on Aqara G4
